In the early 1980's the maze games were all the rage. Universal Lady Bug was a great contender which although wasn't as popular as Pac-Man or Ms. Pac-Man, it certainly had it's own unique features which added just enough to separate the game from the competition. The game play is similar to the Pac series instead of collecting dots, your collecting what looks like asterisks or tiny flowers. You have other insects chasing you not ghosts. The cool part about Lady Bug is that you can manipulate the maze you have these levers which can alter the maze and temporarily keep the enemies away from killing you. Prior to the enemies coming out of it's area the outside of the maze has a count down timer indicating when they will start to be released. Skulls are helpful so long as you don't touch them, however it will kill the enemies if they touch them. Once all of the enemies are released on the level the inside area will have a bonus vegetable which will temporarily freeze the enemies once it's touched, and award you with bonus points. As you continue to move through the levels the point value of the vegetable / item will increase by 500 points, however once you hit level 18 it will max out at 9500 points. You also have letters in the game which if you collect the red letters it will spell out SPECIAL, collecting the yellow letters spells out EXTRA. If your playing the game on location and you want to try and earn an extra credit collecting special will do just that, if your looking to prolong your current game keep spelling EXTRA with the yellow letters and you will be awarded an extra lady bug. In addition to that if your really looking to maximize your score collect the blue circles with the pink hearts, this will advance the multiplier up to 5x. When you do this if you collect a red letter they will be worth 800pts x 5x which will equal 4000 points.
Lady Bug actually got more exposure from the Colecovision. However the Arcade version had superior graphics.
My Lady Bug prior to restoring
When I first got the game it was in fair original condition considering the games age. However someone at some point drilled the original plastic control panel and used an adapter plate to use a wico joystick. For nearly almost a year I looked for a replacement control panel and proper joystick for the Universal cabinet. Although the wico joystick is in my opinion a better functioning joystick I wanted to track down the original one that the game utilized. At first I got cocktail joysticks which were slightly shorter. I finally found a replacement control panel without it being molested but the ball top was missing from the original joystick. After continuing to search and search finally I was able to find the direct ball top replacement which according to the manual is a 32 mm ball top. This Universal cabinet was originally built in Taiwan. I would go as far to say that not many things were universal about them. Some had slight variances from game to game. Another popular Universal title which shared the same generic cabinet was Mr. Do.
The Universal joystick is certainly different where it has vertical leaf switches. Here you can see the exploded view of how the Universal Joysticks are assembled :
And over the past roughly year you can see some of the bits and pieces of other Universal Joysticks I've come across. The first three are cocktail joysticks and the one on the right with the missing ball top is for the upright. I had another member sand blast the rust off of it, and ended up actually selling majority of these as I don't really need that many back-ups. Another member had a Space Panic control panel with the upright joystick and I ended up using that and selling the remainder of the Space Panic control panel populated.
Universal Joysticks
Another thing the universal control panel had was these cross haired translucent player one and player two start buttons. These are actually more commonly found as Gottlieb pinball flipper buttons. The artwork on Lady Bug is nicely done which I think it was originally done by the artist Kohtani.
I pulled the original marquee off since it had some tape / residue and minor scratching. Using goo gone, as well as novus it started to clean up nicely. Below you can see a picture of the marquee of what it looked like to prior to cleaning it up. I have seen a few variations of the Lady Bug marquee the one I have which is more of a magenta or pink type background as well as a green one.
Lady Bug Marquee
Back Lit Plexi
One of the coolest features of the Universal cabinets below the marquee is the back piece of plexi gets lit. It creates a really nice look and certainly stands out from other games. It's really one of the few games I can think of that this is featured on.
One of the games biggest eye sores was the original coin door needed to be cleaned up. I stripped all of the parts off the coin door and sanded / painted accordingly. In addition to that the bottom area was also painted black as well.
Another thing that the Universal cabinets have is flat 3/4'' T-Molding. Although mines not perfect and could use a replacement It's still mostly intact so I left it because I wasn't able to find a suitable replacement.
Flat 3/4'' Black T-Molding
After working on the game with my magnetic tools the monitor colors were off & needed to be degaussed. If you have one side of your monitor with good colors and the other side is faded or looks odd try using a degausser, most likely it will fix your issues. I once again used my GC Throsen 9317 High Power Degaussing Coil, which can be purchased here.
As of right now currently my high score on Lady Bug is 123,600.
One of the rarer titles in my collection is Sente / Bally's Chicken Shift. The game play is rather simple yet unique where you only have two rectangular buttons. A red button which shifts red things and a blue button which shifts blue things. Not many people remember playing this game on location but I actually first played this on Long Island at an arcade known as "Space Plex". The Chicken shift game at Space Plex was housed inside a midway Pac-Man cabinet which was known as a "Sac-Man". Three different versions of the Sente cabinet exists you have the dedicated Sac-1a which was a huge cabinet that doesn't fit through a standard door which has the large fiberglass / white plastic sides. The other dedicated Sente cabinet was known as a Sac-1b. And finally you also had conversion cabinets generally housed in midway cabinets known again as "Sac-Mans".
Ever since I've been collecting arcade games I've always wanted to have a dedicated Chicken Shift in my collection. I found a Sac-1b dedicated cabinet located in Pennsylvania. The Sente cab had "Hat Trick" inside which is another Sente game. The Sente system was way ahead of it's time. It utilized a cartridge system so that operators can easily swap out games. Some of these Sente titles included not only Chicken Shift & Hat Trick but; "Gimme A Break", "Goalie Ghost", "Mini Golf", "Name that Tune", "Night Stocker", "Off the Wall", "Rescue Raider", "Snacks'n Jaxson", "Snake Pit", "Spiker", "Stocker", "Stompin'", "Street Football", "Toggle", & The "Trivial Pursuit" series.
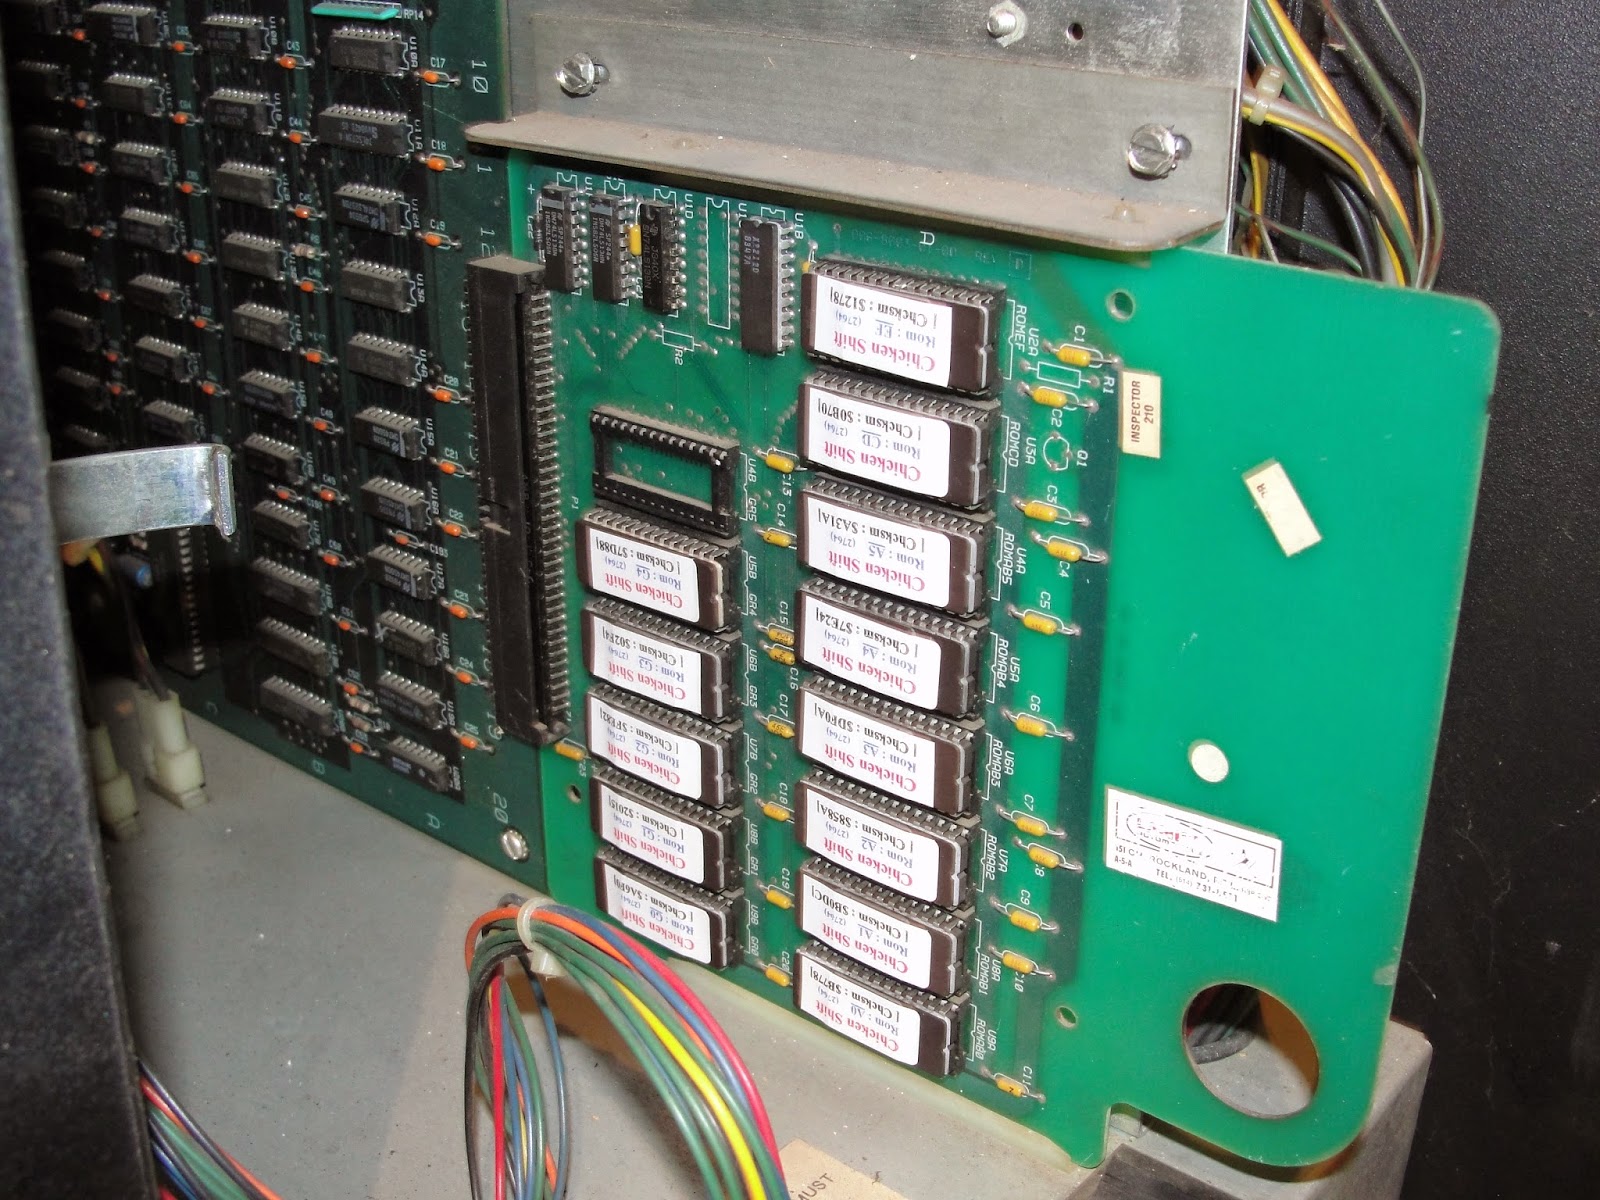
Chicken Shift Roms
Prior to obtaining the Sac1-b cabinet I knew that I was going to need to track down some Chicken Shift parts. I ordered the rom set from Steph at hobbyroms.com. While I now own my own rom burner steph is great if you don't have a rom burner and need arcade roms. Next I needed to obtain the various artwork for Chicken Shift. Only a finite amount of Chicken Shift owners are known to exist on such a rare title I was lucky that a KLOV member was willing to scan in his dedicated control panel , as well as dedicated marquee. A while ago on the MAMEWORLD forums someone came up with a chicken shift control panel but the accuracy was way off.
Above you can see on the left the mameworld badly misrepresented vecotorized version where as on the right you can see a sample of the actual chicken shift control panel scan. My artwork skills in adobe illustrator are terrible so I actually had someone assist me in getting a proper vector file done from the original scans, and they came out looking awesome! The same was done for the marquee as well.
Hat Trick Roms
Chicken Shift Roms
Chicken Shift uses essentially 13 Roms not included the sound rom file which is separate on the soundboard. Above you can see 13 of the 14 slots are being utilized with 1 left intentionally blank on the donor cartridge. All of the Sente games to my knowledge use the exact same sound Rom and are interchangeable between the games. Some of the cartridges you can swap roms and use a cartridge as a donor cart. I was extremely lucky to find a blank 14 slot empty cartridge (being that the 14 slot carts are more rare) off ebay for $11 bucks!
So now I potentially had a working Chicken Shift cartridge but still needed to test / fix a few things on the sac-1b cabinet prior to testing the game. The Sente cabinets utilize a main mother board, the cartridge, a power power supply board, and separate sound board. Not knowing the condition of the power supply I saw Todd Tuckey on ebay from TNT Amusements was selling advertised working power supplies for the sente system, I ordered two. When I got the cabinet the original g07 monitor was present unfortunately the chasis was removed. I had an extra test CRT and proceeded to hook up.
The Sente Sac-1b cabinet has metal inlay control panels that are interchangeable between the games. On the left you can see how the cabinet looked like when I first got it. For the most part all of the Sente games essentially shared the same generic side art with an exception of "Snake Pit" in the sac-1a. The side art on my Sac-1b cabinet was in decent shape, but I decided to just repaint some of the black. I proceeded to mask off the generic green Bally / Sente logo on the sides. Meanwhile I contacted a local metal shop which I had them custom cut some blank panels. Getting back to the cabinet the bottom was in bad shape and needed to be rebuilt. Also some of the metal hardware also needed to be repainted. The next step was to start taking the Sente Sac1-b cabinet apart.
Removing various parts
Primer added prior to painting
Here you can see I started to strip the cabinet down, and mask / paint various areas of the sac-1b. Also the Sente cabinets if you look you can see a large metal base underneath the boards. The metal housing actually has wheels and slides out for easier access to the parts.
Here you can see I stripped off all of the parts from the Hat Trick control panel, and had my metal shop cut me some blank Sente control panels. This control panel is actually in decent shape for a Sente panel and the reason why is because originally they silk screened the art directly onto the panels. When players would sweat the ink would literally over time start to deteriorate. Some are more prone to issues such as sente games that utilized trackballs where the players palms were constantly rubbing the control panel. Sometimes with rare games you need to fabricate your own parts.
Hat Trick working
With the donor monitor this was awesome knowing the main mother board, sound board, power supply and cartridge for hat trick was all working. Now the real test, Chicken Shift.... Sure enough once all the roms were properly placed on the donor 14 slot cartridge it fired up!
Chicken Shift working
I initially tested the control with the Hat Trick control panel and if I recall up, down respectively were used as the "shift" buttons in chicken shift. I needed to recreate my own harness. I grabbed my crimper, wire, and molex connectors and begin to build my new harness. As I stated above although the Chicken Shift controls are rather simple and in game only utilize 2 in game buttons, you in addition still have the p1, p2 start buttons. Below you can see I created my own harness with new molex connectors, new pins, and new wire.
Red & Blue Rectangle Chicken Shift Buttons
I started to reassemble the cabinet once all the parts that I wanted to refurbish and paint were finished. Artwork was originally scanned in by a KLOV member, after I had help with the scans to be professionally and properly vectorized. I applied the artwork to one of the blank Sente metal control panel inlays for the Sac-1b, along with hooking up the controls with the proper disconnects.
Awaiting control panel inlay
Chicken Shift control panel
Chicken Shift Sac-1b
The game is essentially finished and ready to be enjoyed bringing back
great memories. While this game is not incredibly sought after by every
collector to me has way more of a nostalgic value that probably exceeds
it's true cost. Who knows perhaps down the road Sente / Bally games will
be more sought after once they get more exposure. I only know of about
3-4 of these to exist outside of perhaps CAX which is known as
california extreme not that many are known to be publicly displayed.
It's been rumored that possibly a Sente multi cart would be available in
the near future, only time will tell. Currently enjoying my dedicated
Sac-1b Chicken Shift, which after tracking down all of the rare parts /
having reproduction fabrication done I doubt this will be leaving my
collection anytime soon. I have over time collected a few original sente
game cartridges, back up power supplies, main motherboards, as well as
other sente artwork and control panels. More than likely this Sac-1b
will remain a Chicken Shift.
"Dragon's Lair: The fantasy adventure where you become a valiant
knight, on a quest to rescue the fair princess from the clutches of an
evil dragon. You control the actions of a daring adventurer, finding his
way through the castle of a dark wizard, who has enchanted it with
treacherous monsters and obstacles. In the mysterious caverns below the
castle, your odyssey continues against the awesome forces that oppose
your efforts to reach the Dragon's Lair. Lead on, adventurer. Your quest
awaits!". That quote will forever be etched upon your brain if you have ever played Dragon's Lair. That's the intro during attract mode. Dragon's Lair was released by Cinematronics in 1983, which was worked on by Don Bluth. The animator Don Bluth also worked for Disney creating classics such as The Secret of NIMH (1982), An American Tail (1986), The Land Before Time (1988), All Dogs Go to Heaven (1989), Rock-A-Doodle (1991). He worked on animating several other movies but will forever be know for his contribution to one of the most technologically amazing video games at the time.
Dragon's Lair is also one of only three video games (along with Pong and Pac-Man) in storage at the Smithsonian Institution in Washington, D.C.
Essentially Dragon's Lair is a cartoon that is played on a laser disc which you control Dirk's quest. The laser disc player jumps from scene to scene depending on selecting the correct move. You control Dirk with a wico joystick maneuvering up, down, left or right, as well as a sword button. The controls seem easy yet the game is certainly frustrating if your unfamiliar with the game play. You start out with 5 Dirks which seems like a decent amount until you realize how quickly and easily if your timing isn't perfect you can perish before you can blink. This game to my knowledge at the time was one of the first games that cost .50 cents, In 1983 that was a big deal. Dragon's Lair's are getting tougher to find especially running original hardware such as a laser disc / laser disc player. I found one that wasn't restored but I needed to ship the game. I was scared and reluctant to do so because at first the seller wasn't providing me with all of the pictures I needed to know if they game was complete. The game was claimed to be complete but also stated arcade technician needed, game doesn't work. I didn't mind at this point I'm confident with time I can fix just about any machine so I took the chance and shipped it almost blind.
When I got the machine I turned it on and the fan vibrated the entire machine and was really loud, I then simply disconnected. The good thing was that the machine looked essentially "complete"as far as the hardware. The score board lit up, monitor had a vertical collapse issue. At this point I decided to replace the existing LV1000 laser disc player with an upgraded Pioneer LV4400. Before you can upgrade the laser disc player you need to make sure you have Shaun Wood's "Merlin" board installed.
Upgraded replacement Pioneer LV4400
I tested the Pioneer LV4400 hooked right up to my LCD just to be able to test the player while I was waiting for my Merlin board from Shaun Wood. The Laser Disc player needs to have a baud rate of 4800 in order for it to be compatible with the Merlin card.
Testing LV4400 on my LCD TV
Dragon's Lair Power Supply
Shaun Wood's Merlin Board
Above you can see the original card on the left with the ribbon disconnected, on the right it's replaced with Shaun Woods Merlin. To obtain a Merlin board I highly recommend you talking to Shaun first to see exactly what your needs are http://wood1st.com/LaserCon/Merlin/index.htm . I can't say enough good things about Shaun Wood without him my Dragon's Lair along with many others wouldn't be using original hardware so I tip my hat. Shaun also guided me along with any questions about Dragon's Lair in general. A wealth of knowledge exists on his site the DLP Forums also known as the http://www.dragons-lair-project.com/ .
Cosmetically the game was completely missing side art but the original vinyl was in decent shape, I used armor all to clean the side of the cabinet. One thing I can recommend is that make sure it's completely dry before trying to apply side art or you will have a problem with the adhesion of the side art to the cabinet. The game was cleaning up nicely.
Side Art Installed
I originally ordered parts from Anthony at quarterarcade.com for the side art (as shown above with the premask, after installed shots), marquee, as well as the control panel overlay.
My original control panel overlay was missing a chunk of Dirk's legs. Not only was it missing but it was dirty and faded and needed to be replaced. Now to the common person most would see the below replacement suitable but I'm extremely picky when it comes to certain things about my restorations. Anthony's artwork although officially licensed was a complete abomination.
It's rather apparent that quarterarcades artwork doesn't compare to the original and the quality wasn't what I expected. Anthony on his website stated "Reproduction Dragon's Lair upright arcade game control panel overlay.
CPO is professionally printed on 10 mil adhesive backed lexan, 4 color
process, color matched and die cut. This is the only Dragon's Lair CPO
licensed in the world! 100% money back guaranteed!". Well I wasn't happy so I talked to Anthony and he basically said he was aware of the issue which effects all of his cpo's. I kept the side art since that looked fine and was on the hunt for a NOS also known as New Old Stock CPO from 1983. What are the chances I was going to actually track one down ? I saw that someone on KLOV (Killer List of Video Games) posted one was for sale but I wasn't fast enough and it was quickly sold. Although it had delamination issues the colors were sharp and most of the issues were on the bottom of the control panel which wouldn't of been noticed. Since I pointed those issues out to Anthony he actually now changed some text on his website to reflect it, he now says "Please note that we have done our best
with this reproduction, but have had some people indicate they were not
completely happy with the quality of the artwork printing on this
particular overlay. Because of the complexity of the original artwork,
this was a very difficult piece to recreate (it cannot be redrawn
easily, like other pieces we carry). We did borrow a NOS piece, had it
scanned and recreated and this is what our printer was able to come up
with. Please take a look at the pictures before purchasing.". Anthony kindly accepted my return and I actually needed other parts so it worked out fine.
I got a message from the person who bought the NOS overlay on KLOV & said they were just using it as a back up and I was eligible to purchase it if I wanted it! At this point I was able to get Dirk's legs back and have an original overlay from 1983 that looked sharp. I started to take apart the control panel. To reiterate on prior posts once again I used a wall paper steaming machine to get off the chunks missing control panel overlay. I then began to proceed to sand down the control panel making sure no vintage glue remained. I probably should of waited until the NOS overlay actually got to my house but I wanted to start the process. Luckily It was in better shape than I expected it to be.
Control Panel sanded down getting ready for NOS CPO!
NOS CPO installed
At this point I used plastic clamps overnight to hold the NOS CPO in place. The following morning I then proceeded to clean the original wico shaft in the chuck of my drill, installed new switches, sanded and painted various bolts. Oh yeah for whatever reason this was the first game of dozens that I've worked on that the leaf buttons / leaf switch holders and pal nuts decided to not budge, I ended up just using my sawzall to fix that. Control Panel came out looking amazing! I'm really glad I decided to get an original overlay for this game.
NOS CPO and hardware reinstalled
Also many Dragon's Lair's from the factory had really what I consider low side art. I'm aware of placement was generally much lower however I hate the side art sitting that low so what did I do, not only did I place it higher which looks much better, but I got confirmation from Shaun Wood who used to work on the assembly line installing the side art in 1983 when he was 18. He basically said the side art height actually varied from cabinet to cabinet and that most of them were installed by him and his other 18 year old friends at the time. While I didn't need that confirmation it felt good to hear that come from someone who originally help produce these in 1983.
Raised Cinematronics coin door logo
Dragon's Lair coin door parts
Resprayed Dragon's Lair coin door
Cinematronics raised lettering logo cleaned up
Above you can see that the original Cinematronics coin door which had the more desired "raised lettering" was still present and in decent shape but needed to be revitalized. I took the coin door apart, removed original paint, hand sanded down the Cinematronics logo, repainted the coin door using my favorite black textured plastic paint new cam lock installed.
Dragon's Lair Scoreboard
The game is obviously unique in the fact that your controlling a cartoon on a laser disc especially for the year 1983 but also this is one of the only video games I can think of that has a score board that's not built into the CRT. The scoreboard displays your score, lives player 2 score, player 2 lives, as well as credits. Not only was my original scoreboard functioning it was in cosmetically good condition. I only lightly used some Novus plastic polish cleaner on it, which looks fine.
Behind Speakers & Scoreboard
Testing TV monitor outside of cabinet
The original Wells Gardner monitor inside the cabinet has a unique NTSC card that has a BNC connector on it that converts the Laser Disc signal to be compatible with arcade monitors. Even though the Pioneer LV4400 Laser Disc player has both BNC as well as Composite out majority of CRT arcade monitors don't have the input without using an adapter. As you can see in the above photo I'm testing the game using a regular TV which has those composite inputs therefore no adapters are needed. Some people who own Dragon's Lair take TV's and simply decase them , have them attached to the existing frame on the inside. I wanted to keep it's original Wells Gardner k4900 monitor so I decided to send out the chassis and NTSC card to fix the vertical collapse. I probably could of fixed it on my own as I'm familiar with cap kits but this particular monitor isn't as easy to replace so I sent it out to a guy that's highly recommended among the arcade community http://thearcadebuffett.com/ . Should you need to get your chassis replaced I suggest contacting him. He actually posts a video of each monitor he repairs on YouTube explaining what he fixed showing the monitor running.
Wells Gardner CRT K4900 NTSC Card
When I unplugged the test TV, I wasn't getting any audio from the game speakers, even though they were properly connected. As it turns out that during attract mode I had set through the dip switch settings the audio to come on once every eight attract scenes. Also you can actually adjust both the background music, as well as the narration serpately with these two knobs as seen in this photo below (The knobs are located to the left inside the coin door) At first I thought they were fuse holders! I'm so used to the volume pots being on the actual PCB's I forgot to check other locations:
Volume Control Background Music & Narration
I also completely replaced the marquee light fixture, it was dead so rather than take a chance wasting time and money the cost of an entire fixture that comes with a lamp is close to a single florescent lamp. Once the monitor chassis and NTSC card was reinstalled and after I hard wired in the LV4400 laser disc player, my Dragon's Lair was ready to play. Below is a video of my Dragon's Lair machine during the attract mode.
 In the early 1980's the maze games were all the rage. Universal Lady Bug was a great contender which although wasn't as popular as Pac-Man or Ms. Pac-Man, it certainly had it's own unique features which added just enough to separate the game from the competition. The game play is similar to the Pac series instead of collecting dots, your collecting what looks like asterisks or tiny flowers. You have other insects chasing you not ghosts. The cool part about Lady Bug is that you can manipulate the maze you have these levers which can alter the maze and temporarily keep the enemies away from killing you. Prior to the enemies coming out of it's area the outside of the maze has a count down timer indicating when they will start to be released. Skulls are helpful so long as you don't touch them, however it will kill the enemies if they touch them. Once all of the enemies are released on the level the inside area will have a bonus vegetable which will temporarily freeze the enemies once it's touched, and award you with bonus points. As you continue to move through the levels the point value of the vegetable / item will increase by 500 points, however once you hit level 18 it will max out at 9500 points. You also have letters in the game which if you collect the red letters it will spell out SPECIAL, collecting the yellow letters spells out EXTRA. If your playing the game on location and you want to try and earn an extra credit collecting special will do just that, if your looking to prolong your current game keep spelling EXTRA with the yellow letters and you will be awarded an extra lady bug. In addition to that if your really looking to maximize your score collect the blue circles with the pink hearts, this will advance the multiplier up to 5x. When you do this if you collect a red letter they will be worth 800pts x 5x which will equal 4000 points.
 .jpg)


.JPG)


